This may be one of my favorite holiday creations to date. These snowflake wall decals are super simple to create and add a splash of whimsy to your holiday home.
Here's what you'll need to start:
- Contact paper (white)
- A permanent marker (black)
- Scissors
- A magazine
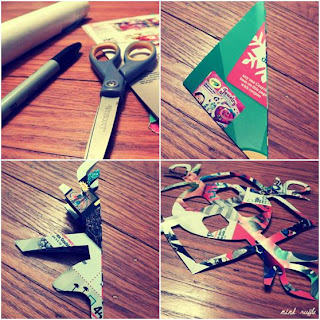
Step 1 - Make your snowflake stencil

Cut a page of your magazine into a square (I find the easiest way to do this is to fold the upper left corner across to the right side of the page, making a triangular flap. Then I cut off the rectangular excess at the bottom). It can be hard to get an appealing design the first few times, that's why I recommend using a discarded magazine to create your stencil.
Step 2 - Trace your snowflake stencil
Once you've chosen the snowflake stencil you like best, tape down a square piece of contact paper, the size of your snowflake (I use scraps of contact paper as the tape). Then, trace the snowflake stencil with your permanent marker.
Step 3 - Cut out your snowflake design
Cut out the snowflake pattern inside the black lines. When you're finished, just peel of the back and stick it to your wall or window. I tested the contact paper on my wall and window, and it didn't peel away the paint or leave behind any sticky residue.
Click here for more pictures of these steps.
Enjoy your holiday season with homemade crafts like this one, and visit the
Mind Ruffle shop this holiday season. Don't forget you can also like Mind Ruffle on
Facebook.


 This may be one of my favorite holiday creations to date. These snowflake wall decals are super simple to create and add a splash of whimsy to your holiday home.
 Cut a page of your magazine into a square (I find the easiest way to do this is to fold the upper left corner across to the right side of the page, making a triangular flap. Then I cut off the rectangular excess at the bottom). It can be hard to get an appealing design the first few times, that's why I recommend using a discarded magazine to create your stencil.